Battery switch on travel trailer function is crucial for managing your RV’s power. Understanding how to use your battery switch—whether it’s a simple 1-2-both or a more complex model—is key to avoiding electrical problems and ensuring you have power when you need it. This guide breaks down the basics, different switch types, safe connection practices, troubleshooting tips, and essential maintenance.
We’ll cover everything from preventing short circuits to keeping your battery terminals clean and corrosion-free, so you can confidently power your travel adventures.
This guide will walk you through the various types of battery switches, their pros and cons, and how to safely connect and disconnect your batteries. We’ll also cover troubleshooting common issues, integrating your battery switch with your RV’s electrical system, and essential safety precautions to keep you and your RV safe. By the end, you’ll be a battery switch pro!
Understanding Battery Switch Functionality in Travel Trailers
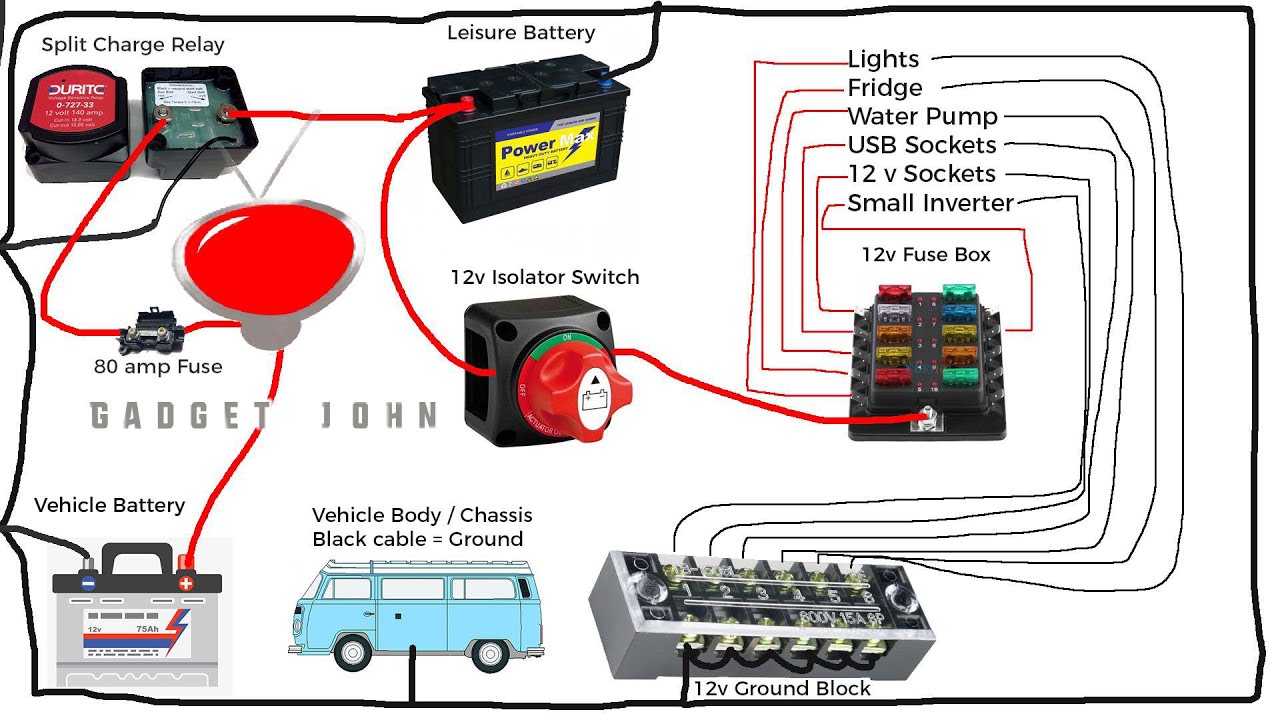
Your travel trailer’s battery switch is a crucial component for managing your power sources. It allows you to isolate or combine your trailer batteries (typically a house battery bank) with your tow vehicle’s charging system or shore power. This prevents unwanted battery drain and helps maximize battery life. Proper use ensures you always have power when you need it.
So, you’re planning a trip? Awesome! Before you pack your bags, remember travel insurance is key. Check out Aon travel insurance for comprehensive coverage. They offer various plans, so finding the right fit for your adventure shouldn’t be a hassle. And if you’re going off the beaten path, consider exploring options from Aon travel insurance too – they might have specialized packages for more adventurous trips.
Don’t leave home without it!
Battery Switch Types and Operation
Travel trailers commonly use two main types of battery switches: 1-2-Both and 1-2-Off. A 1-2-Both switch allows you to connect either battery bank (typically a house battery bank and a chassis battery), both battery banks together, or disconnect both completely. A 1-2-Off switch offers similar functionality but simplifies the process by only providing options for connecting one battery bank, the other battery bank, or turning both off.
Understanding your switch type is key to safely managing your trailer’s power.
Operating a Typical Battery Switch
Operating your battery switch is straightforward, but it’s crucial to understand the positions. Before making any changes, ensure you’re familiar with your specific switch’s labeling. Typically:
- Off: This position completely disconnects both battery banks, preventing any drain or accidental power usage. This is ideal for long-term storage.
- 1 (or Battery 1): This connects only the first battery bank (often the house batteries) to the trailer’s electrical system. This is useful if you only need to use the trailer’s internal systems and don’t need the second battery.
- 2 (or Battery 2): This connects only the second battery bank (often the chassis battery for running lights and brakes) to the trailer’s electrical system. This is less common for typical usage but essential for specific functions.
- Both: This position connects both battery banks in parallel, providing the maximum available power. This is typically used when running high-power appliances or charging multiple devices.
Always turn the switch to the “Off” position before disconnecting your trailer from your tow vehicle to prevent accidental discharge.
Comparison of Battery Switch Types
The choice between a 1-2-Both and a 1-2-Off switch depends on your needs and preferences. Here’s a comparison:
| Feature | 1-2-Both Switch | 1-2-Off Switch |
|---|---|---|
| Number of Positions | Three (1, 2, Both) | Three (1, 2, Off) |
| Flexibility | High; allows for independent or combined use of both battery banks. | Moderate; offers less flexibility than the 1-2-Both switch. |
| Complexity | Slightly more complex to understand and operate. | Simpler to understand and operate. |
| Cost | Generally similar in cost to a 1-2-Off switch. | Generally similar in cost to a 1-2-Both switch. |
Connecting and Disconnecting Batteries
Connecting and disconnecting your travel trailer’s house battery to the tow vehicle’s battery is a crucial step in managing your power system. Proper techniques ensure safe operation and prevent damage to your equipment. This section details the process, emphasizing safety and best practices.Connecting and disconnecting the house battery involves working with potentially hazardous electrical components. Always exercise caution and follow the steps precisely.
Incorrect procedures can lead to sparks, short circuits, and potential injury.
Battery Connection and Disconnection Procedure
Before beginning any work, ensure the tow vehicle and travel trailer are both turned off and the ignition is switched to the “off” position. Locate the battery disconnect switch on your travel trailer. This switch typically controls the flow of power to the house battery. Turn the switch to the “off” position. Now, locate the positive (+) and negative (-) terminals on both the tow vehicle’s battery and the travel trailer’s house battery.
Using appropriately sized jumper cables (typically heavy-gauge, 4 or 2 gauge for most applications), connect the positive terminal of the tow vehicle’s battery to the positive terminal of the house battery. Next, connect the negative terminal of the house battery to the negative terminal of the tow vehicle’s battery. This order minimizes the risk of accidental short circuits.
To disconnect, reverse the process, removing the negative cable first, followed by the positive cable.
Preventing Accidental Short Circuits
Accidental short circuits are a significant risk when working with batteries. To mitigate this risk, always ensure the battery disconnect switch on the travel trailer is in the “off” position before connecting or disconnecting any cables. Keep the cables away from metal parts of the vehicle and trailer to avoid accidental contact. Never allow the positive and negative cables to touch each other.
If a short circuit occurs, immediately disconnect the cables and inspect them for damage.
Importance of Correct Gauge Wiring, Battery switch on travel trailer function
Using the correct gauge wiring is critical for safe and efficient battery connections. Thin gauge wire will overheat and potentially melt under high current loads, posing a fire hazard. Conversely, overly thick wire is unnecessary and cumbersome. The appropriate gauge depends on the amperage draw of your system; consult your travel trailer’s documentation or a qualified electrician to determine the correct gauge for your setup.
For example, a typical setup might use 4-gauge wire for connections to a larger house battery, capable of handling significant current demands from appliances.
Visual Inspection of Battery Terminals
Regular visual inspection of battery terminals is essential for maintaining a reliable connection. Look for signs of corrosion, which can impede current flow and lead to poor performance. Corrosion often appears as a white, powdery substance on the terminals. Clean the terminals using a wire brush or terminal cleaner to remove any corrosion. Ensure that the cable clamps are securely tightened on the terminals.
Loose connections can cause overheating and resistance, reducing battery life and potentially leading to fire hazards. Tighten clamps using a wrench to ensure a firm and consistent connection. Properly tightened connections will be firm and resist movement.
Troubleshooting Common Battery Switch Issues
Dealing with a malfunctioning battery switch in your travel trailer can be frustrating, leaving you without power when you need it most. Understanding the common problems and how to troubleshoot them will help you get back on the road quickly. This section covers identifying common issues, their symptoms, and steps to diagnose and resolve them.
Common Battery Switch Problems and Their Symptoms
Several issues can arise with your travel trailer’s battery switch. These problems often manifest as either a complete lack of power or intermittent power fluctuations. A completely dead battery isn’t always the culprit; the switch itself could be the problem. For instance, a corroded switch might not make a solid connection, leading to inconsistent power delivery. Similarly, a faulty internal mechanism within the switch might prevent it from properly engaging or disengaging the battery connections.
Diagnosing Battery Switch Problems
Before you start replacing parts, systematically check the switch itself. First, visually inspect the switch for any signs of corrosion or damage. Look for loose wires, burned connectors, or any physical damage to the switch housing. Corrosion is a frequent culprit, especially in humid environments. Clean any corroded terminals with a wire brush and baking soda solution, then rinse and dry thoroughly.
If you find significant corrosion or damage, replacement is likely necessary. Next, carefully check all wiring connections to ensure they are tight and secure. A loose connection can cause intermittent power or a complete power outage.
Troubleshooting Flowchart
The following flowchart Artikels a step-by-step approach to troubleshooting your battery switch:
Start
|
----------------------------------------
| |
Is there any power at all?
|
| |
Yes No
| |
-------------------------------------------------
| |
Inspect switch for corrosion/damage.
Check main battery cables for damage/corrosion
| |
No corrosion/damage No corrosion/damage
| |
------------------------------------------------------ ----------------------------------------------------
| | | |
Check all wiring connections.
Replace damaged cables. | Test the switch using a multimeter.
So, you're planning a trip? Awesome! Don't forget to sort out your travel insurance – it's a lifesaver. Check out aon travel insurance for comprehensive coverage; they've got various plans to suit different budgets and trip lengths. And if you're going off the beaten path, seriously consider getting extra protection. For adventurous souls, aon travel insurance might be a better fit, offering specialized coverage for those less conventional trips.
Get a quote today and travel worry-free!
| | | |
No loose connections.
No loose connections |
| | | |
Test switch with multimeter.
Retest the system. | Switch is faulty - replace the switch.
| | | |
Switch is faulty - replace the switch.
System still not working - Seek professional help. | Retest the system.
| | | |
Retest the system.
| | System still not working - Seek professional help.
| | ----------------------------------------------------
System still not working - Seek professional help.
------------------------------------------------------
|
End
Remember to always disconnect the negative battery terminal before performing any work on your electrical system.
Safety first!
Battery Switch and Electrical System Integration
Your travel trailer’s battery switch isn’t an isolated component; it’s the central hub connecting your batteries to the rest of your electrical system. Understanding its interaction with other parts is crucial for safe and efficient power management. This section will detail how the switch works in conjunction with key systems like the converter and inverter, clarifying power flow and potential issues.
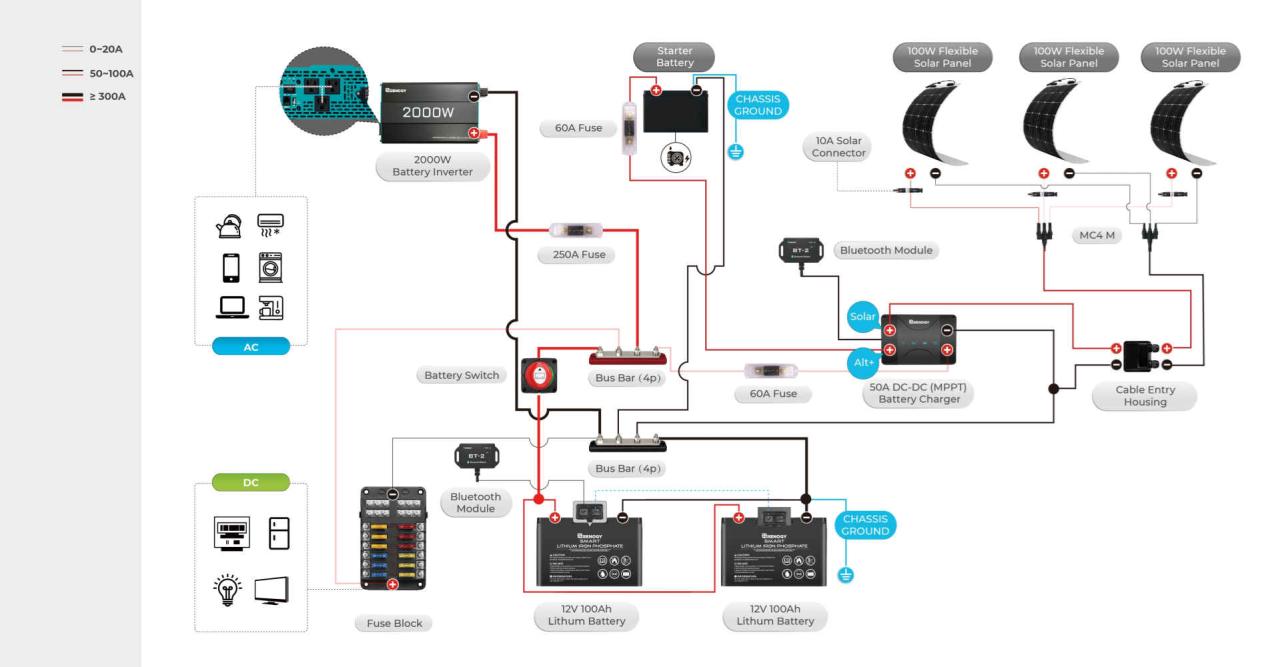
The battery switch acts as a gatekeeper, controlling the flow of power from your house batteries to various circuits within your RV. It works in concert with the converter, which transforms 12-volt DC power from your batteries into 120-volt AC power for household appliances. Similarly, the inverter converts 12-volt DC to 120-volt AC, but usually for specific devices or during temporary outages.
A properly functioning battery switch ensures that power is routed correctly and safely to these systems.
Power Flow Diagram
Imagine a simple diagram: Your house batteries are at the top. A line connects them directly to the battery switch. From the switch, several lines branch out. One line goes to the converter, supplying the DC power it needs to operate. Another line goes directly to the 12-volt DC circuits in your RV (lights, water pump, etc.).
A third line might lead to an inverter, providing the DC power source for AC power needs. Each line has a fuse or circuit breaker for safety. This ensures that a short circuit in one part of the system doesn’t affect the others. The diagram visually represents the controlled distribution of power, originating from the batteries and guided by the switch.
Power Distribution Methods with Different Battery Switches
Different battery switches offer varying levels of control over power distribution. A simple two-position switch (on/off) provides basic control, connecting or disconnecting all house batteries from the system simultaneously. More advanced switches, such as those with multiple positions, allow you to select different battery banks (e.g., separating house batteries from starting batteries), or even connect to shore power independently.
A multi-position switch offers much finer control, enabling you to charge specific batteries, use only one battery bank, or disconnect everything for maintenance. The key difference lies in the flexibility and safety features they provide. For example, a switch with a “battery-off” position offers a complete disconnect for safety during maintenance.
Implications of Improper Wiring
Incorrect wiring around your battery switch can have serious consequences. A common problem is reversed polarity, where the positive and negative wires are accidentally swapped. This can damage your batteries, the converter, the inverter, and even cause a fire. Poor connections can lead to overheating and potential fire hazards. Furthermore, improperly sized wiring can overheat and potentially cause damage to your equipment.
Using undersized wire for high-current devices like an air conditioner could result in overheating and failure. Always follow the manufacturer’s wiring diagrams and use appropriately sized wires and fuses to prevent these problems. Regularly inspect connections for corrosion or looseness.
Safety Precautions and Best Practices: Battery Switch On Travel Trailer Function
Working with batteries and the electrical system in your travel trailer requires careful attention to safety. Improper handling can lead to serious injury, damage to your equipment, or even fire. Following these best practices will help ensure a safe and successful experience.
Always prioritize safety when working with any electrical system. A seemingly minor mistake can have significant consequences. Remember, prevention is always better than cure.
Disconnecting the Battery Before Maintenance
Before performing any maintenance or repairs on your travel trailer’s electrical system, always disconnect the negative (-) battery terminal first. This prevents accidental shorts and protects you from electric shock. After completing your work, reconnect the negative terminal last. This simple step is crucial for your safety. Never work on the electrical system with the battery connected unless absolutely necessary and you are fully trained and equipped to do so.
Safe Storage and Handling of Batteries
Proper storage and handling of batteries are essential for their longevity and safety. Always store batteries in a cool, dry place, away from direct sunlight and extreme temperatures. Avoid storing batteries near flammable materials. When handling batteries, wear appropriate protective gear, including gloves and eye protection. Never attempt to charge or use a damaged battery.
Dispose of old batteries properly according to local regulations. Consider using battery acid neutralizer if there is a spill.
Recommended Tools and Equipment
Having the right tools makes any job easier and safer. Here’s a list of recommended tools and equipment for working on your travel trailer’s electrical system:
A well-equipped toolbox will significantly improve your ability to work safely and efficiently. Having the correct tools will also minimize the risk of accidental damage or injury. The tools below are essential for basic maintenance and repairs.
- Battery wrench: For disconnecting and connecting battery terminals.
- Voltage meter: To check battery voltage and ensure proper charging.
- Multimeter: For testing circuits and identifying electrical problems.
- Wire strippers and crimpers: For working with electrical wires.
- Insulated screwdrivers: To prevent accidental shocks when working with electrical components.
- Safety glasses: To protect your eyes from sparks and debris.
- Work gloves: To protect your hands from cuts and abrasions.
- Flashlight or work light: To illuminate the work area.
Battery Switch Maintenance and Replacement
Keeping your travel trailer’s battery switch in top condition is crucial for reliable power and preventing costly repairs. Regular maintenance, including cleaning and inspection, will extend its lifespan and ensure your electrical system functions smoothly. Knowing how to replace a faulty switch is also a valuable skill for any RV owner.
Routine Maintenance Schedule
A simple, consistent maintenance schedule can significantly extend the life of your battery switch. Aim for a visual inspection at least every three months, and a more thorough cleaning and inspection every six months to a year. This schedule should be adjusted based on your usage and environmental conditions; more frequent checks are recommended in harsh climates or if the trailer is frequently exposed to the elements.
During these inspections, check for loose connections, corrosion, and any signs of damage to the switch itself or its wiring. Pay close attention to the mounting bolts to ensure they remain tight and secure.
Replacing a Faulty Battery Switch
Replacing a battery switch is a straightforward process, but safety is paramount. Always disconnect the negative battery terminal before beginning any work. Carefully note the wiring configuration before disconnecting any wires; take photos or draw a diagram if needed. Use a suitable wrench or socket to remove the mounting bolts securing the switch to its mounting bracket.
Once removed, carefully disconnect all wires from the old switch, making sure to label each wire to avoid confusion during reinstallation. Install the new switch, ensuring it’s securely mounted to the bracket using the appropriate fasteners. Reconnect the wires according to your notes or diagram, double-checking each connection. Finally, reconnect the negative battery terminal and test the switch functionality.
Cleaning and Protecting Battery Terminals
Corrosion on battery terminals is a common problem that can lead to poor connections and reduced battery performance. To clean the terminals, first disconnect the negative terminal. Use a wire brush or terminal cleaner to remove any corrosion. Apply a corrosion inhibitor or terminal protector to prevent future corrosion. This will ensure a reliable connection and extend the life of your batteries.
Always remember to reconnect the negative terminal last.
Securing the Battery Switch
Properly securing the battery switch to its mounting surface is critical for preventing vibrations and ensuring reliable operation. The switch should be mounted on a sturdy, level surface, ideally within a weatherproof enclosure. Use the appropriate size and type of fasteners specified by the manufacturer. The mounting bolts should be tightened securely to prevent movement but avoid over-tightening, which could damage the switch or its mounting bracket.
Once mounted, inspect the switch for any wobble or looseness. If any movement is detected, re-tighten the bolts or consider using additional support brackets to enhance stability. Consider using locking washers or nuts to further secure the switch and prevent loosening over time due to vibrations. The goal is a solid, immovable mount that protects the switch from environmental factors and mechanical stress.
Mastering your travel trailer’s battery switch is a small step that can prevent big headaches. By understanding the different types of switches, following safe operating procedures, and performing regular maintenance, you can ensure a reliable power supply for all your adventures. Remember, safety is paramount; always disconnect the battery before working on the electrical system. With a little knowledge and care, you’ll keep your RV running smoothly and your trips worry-free.
FAQ Guide
What happens if I leave my battery switch in the “off” position for a long time?
Leaving your battery switch off for extended periods prevents any drain on your house battery, protecting it from deep discharge. However, you’ll lose any stored power in the house battery.
How often should I check my battery terminals for corrosion?
Ideally, check your battery terminals every few months, or more frequently if you live in a humid climate. Corrosion can reduce performance and even cause safety hazards.
Can I use any type of wire for connecting my batteries?
No, using the correct gauge wire is critical. Using undersized wire can lead to overheating and potential fire hazards. Consult your RV’s wiring diagram or a qualified electrician for the correct gauge.
My battery switch is making clicking noises. What’s wrong?
Clicking sounds often indicate a problem with the switch itself, possibly a faulty internal component or low battery voltage. Try cleaning the terminals and if the issue persists, the switch may need replacement.
